Interlinear Text Editor (ITE) Manual
SOMMAIRE
I. The Main Window
This window is the container for other windows opened in using the program. It has a menu bar with four menus: File, Windows, Tools and Help.
The File menu
The File menu has 4 options: New, Open..., Load lexicon from file... and Quit.
Newis for creating a new, empty text document. When you chooseNew, a dialog window is opened to allow you to specify various characteristics of the text document markup. The default values are those corresponding to the markup used by the Lacito archive. To use these values, click on OK without changing anything.
If your annotation documents have a different XML structure from the Lacito Archive's one (structure defined by a specific DTD) you will have to (1) modify the parameters in the XPath definitions which allow ITE to search a document, (2) create an XSLT stylesheet which allows ITE to modify a document. This stylesheet has to accept three parameters
- The
whatparameter tells the stylesheet what action it is to do. Its possible values are:createLevelcreates a new object (text, sentence, word or morpheme)createAnnotationcreates a new annotation (transcription or translation/gloss)embedLevelembed an object (text, sentence, word or morpheme) inside another object from an upper levelembedAnnotationembeds an annotation (transcription or translation/gloss) inside an object (text, sentence, word or morpheme)
- The
levelparameter is used in case ofwhat="createLevel", to get the level of the created object. Possible levels are:[doc, text, sentence, word, morpheme]. Ifwhat="createAnnotation", thenlevelparameter tells what kind of object the annotation is created for. - The
annotationparameter is used in case ofwhat="createAnnotation"to give the type of annotation chosen between the values[translation, transcription]
You'll find three implementations in the sources (
modifications.xsl,modifications_en.xslandmodifications_fr.xsl).The different sets of parameters you may use, can be stored in an XML document (file
prof.xml) in the same folder as the ITE application. The structure of this document is quite simple: you'll just have to assign thevalueattribute to the url of the files which contains the other parameters.You'll also have to assign thenameattribute. This name will appear in the list at the bottom of the "Xpath definition dialog".<?xml version="1.0" encoding="iso-8859-1"?> <profile> <item name="option1" value="file://c:/ITE/options1.xml"/> <item name="option2" value="file://c:/ITE/options2.xml"/> </profile>
The definition parameters documents are also XML documents. You can store them wherever you like, just put correctly the url in the
prof.xmlfile. For a new definition file take a look at (enOptions.xml,frOptions.xmlanddefault.xml) which are in the source code.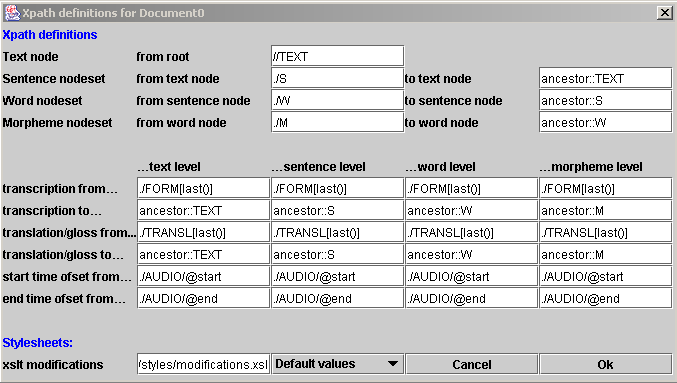
The Xpath definition dialog- The
Open...is for opening an existing annotation file. The same parameter window appears as forNewabove. More than one annotation file can be opened at once, and ITE will take all of them into account in making its lexicon, concordance, etc., although only one will be active (available for editing) at a time. The set of open files will be called the "current corpus".Load lexicon from file...allows the user to load a previously saved (see below) lexicon to use, for example, in glossing a new text. Use the sub-menu to specify whether the lexicon is of words or of morphemes. This can be quicker than reconstructing the lexicon by loading previously glossed texts. In addition, advanced users may find a way to construct an ITE lexicon from other sources, like existing dictionaries, for use in glossing text.
The lexicons built and used by ITE conform to the following DTD. (The attributenbcontains the number of times the item appeared in the corpus on which the lexicon was based.):<!ELEMENT lexique (item*) > <!ELEMENT item (transcription,glose) > <!ATTLIST item nb CDATA #REQUIRED> <!ELEMENT transcription (#PCDATA) > <!ELEMENT glose (#PCDATA) >
Quitquits, prompting the user to save any modified files.
The Windows menu
Windows lists the open annotation files and allows you to choose the active file. The editing window of the active file is brought to the foreground.
The Tools menu
Tools has three options: Lexicon..., Concordances... and Preferences. These are indexes (lexicons or concordances) calculated from all currently open files. Selecting one of these options brings up a dialog box first, to set parameters, and then the result. Preferences is for show/set the ITE preferences
Lexicon...This option displays the lexicon, that is, the set pairs (transcription, gloss) at the word or morpheme level in the currently open text files (the 'current corpus'), and in any lexicon which may have been opened independently via the
Load lexicon from file...option of the MainFilemenu. In the parameter window, choose the appropriate level,wordormorpheme.
Parameter window for the lexiconThe lexicon is presented as a list in three columns, transcription, gloss, number of occurrences. The list can be sorted according to the contents of any one of the columns by clicking on the column header, and the columns can be displaced by dragging the column header. The lexicon can be saved for future use (option
save as...), e.g. for loading via theLoad lexicon from file...option of the MainFilemenu.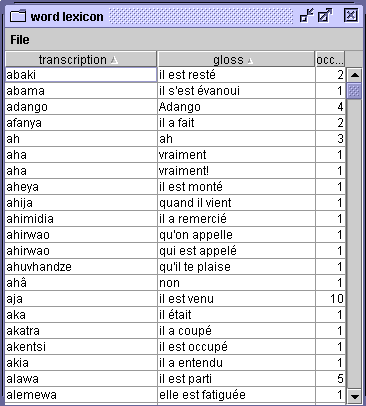
Lexicon display windowConcordances...A concordance is an index of each occurrence of items (words or morphemes) in the current corpus, shown with the context in which it occurred and a reference to the location in the corpus.
There are 5 parameters which are:- Pattern (regular expression). For example
"a.*"will search for all the units which starts whith an"a" - Xpath predicat. This parameter permits advanced users to restrict searches to items with particular structural characteristics, which must be defined in the XPath language. For example: the predicat
contains(@transl, "m")take into acount, only the units with a translation which contains the characterm. - Choose whether words or morphemes are to be concorded.
- Whether the displayed context should be allowed to cross sentence boundaries (scope: text) or not (scope: sentence)
- the amount of context displayed with each item, that is, the maximum number of words to the right and left of the indexed item

Concordance parametersThe concordance is presented in 4 columns: identifier, left context, item, right context. The columns can be moved or sorted in the usual ways. In general, concordances are sorted by the concorded item, with a secondary sort based on either the context (right or left) or the identifier. A secondary sort is performed by a
control-clickon the column header.
Concordance display windowConcordances are useful for locating transcription errors. When an error is identified, double-clicking on the concordance line brings up an editing window in which the original sentence can be edited.
The appearance of the concordance can be modified by a stylesheet (conc.xslfile) stored in the ITE application folder. If this file doesn't exist then the default one is used. This stylesheet must implement three rules (xsl:template). The names of these rules are:rightContextwith the parameters:scope(possible values:'text'or'sentence')nbWords(possible values: a number)
leftContextwith the parameters:scope(possible values:'text'or'sentence')nbWords(possible values: a number)
itemForm
the current node can be either a word or a morpheme.
The file can defines the display rules. For example: insertion of hyphens between the different morphemes of the same word.<xsl:template match="W/M[position()!=last()]/@form"> <xsl:value-of select="."/><xsl:text>-</xsl:text> </xsl:template>
All you need to know to write your own stylesheet is the internal DTD for the corpus inside the application ITE:
<!-- the root                                -->
<!ELEMENT      corpus        (S*)              >

<!-- S for sentence                          -->
<!ELEMENT      S             (W*)              >
<!ATTLIST      S
		  id       CDATA              #REQUIRED
		  win      CDATA              #REQUIRED
		  pos      CDATA              #REQUIRED>
<!-- + all the other attributs you have created -->

<!-- W for Word                              -->
<!-- form for transcription                  -->
<!-- transl for glose                        -->
<!ELEMENT      W              (M*)             >
<!ATTLIST      W
		  form       CDATA            #REQUIRED
		  transl     CDATA            #REQUIRED>
<!-- + all the other attributs you have created -->

<!-- M for Morpheme                          -->
<!-- form for transcription                  -->
<!-- transl for glose                        -->
<!ELEMENT      M               EMPTY           >
<!ATTLIST      M
		  form       CDATA            #REQUIRED
		  transl     CDATA            #REQUIRED>
<!-- + all the other attributs you have created -->
- Pattern (regular expression). For example
-
Preferencesis for show/set the ITE preferences. Two buttons allow you to save all these preferences in a fileSave to file...or to load them from a fileLoad from file....regex (text > sentence)the regular expression by which ITE recognizes sentence boundaries, and which allows it to split a text into sentences.regex (sentence > word)the regular expression by which ITE recognizes word boundaries, and which allows it to split sentences into words.regex (word > morphèmes)the regular expression by which ITE recognizes morpheme boundaries, and which allows it to split words into morphemes.transcription sort ordercollation order to use for transcriptions. The syntax used is defined in a java classjava.text.RuleBasedCollator. It is relativly simple and intuitive. It is resumed below.glose sort ordercollation order to use for the gloss.
The syntax used for the definition of a collation order is a sequence of rules. Each rule is of one of three forms:
<modifier>
<relation> <text-argument>
<reset> <text-argument>Text-Argument: any sequence of characters, excluding special characters and rule syntax characters. If those characters are desired, you can put them in single quotes.Modifier: There are currently two modifiers that turn on special collation rules.
'@' : Turns on backwards sorting of accents (secondary differences), as in French.
'!' : Turns on Thai/Lao vowel-consonant swapping.Relation: Les relations peuvent être des 4 types suivants:
'<' : Greater, as a letter difference (primary)
';' : Greater, as an accent difference (secondary)
',' : Greater, as a case difference (tertiary)
'=' : EqualReset: The character '&' is used primarily for contractions and expansions. The following are equivalent ways of expressing the same thing:a < b < cora < b & b < c.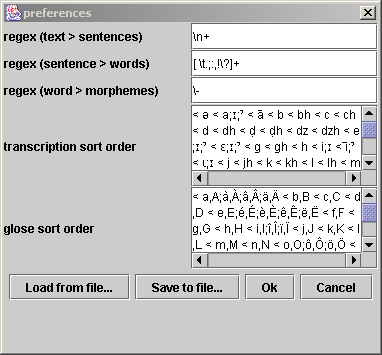
The preferences window
The Help menu
The option About... of the Help menu brings up a reference to the GNU General Public License.
II. The Editing Window
This window is for entering and editing text annotations. The menu bar at the top of the window has the following menus: File, Edit and Tools. Just below the menu bar there is a series of four tabs: (Text, Sentence, Word and Morpheme). These give access to the different levels of annotation. The main part of the window displays fields in which annotation (transcriptions and translations) can be entered or modified. The presentation of these fields depends on the level of annotation being edited. At the bottom of the window are: arrows which permit the user to move backward or forward to the next sentence in the text; the video or sound media player (if any) corresponding to the annotation; and the glossing button (functions at the word and morpheme levels only).
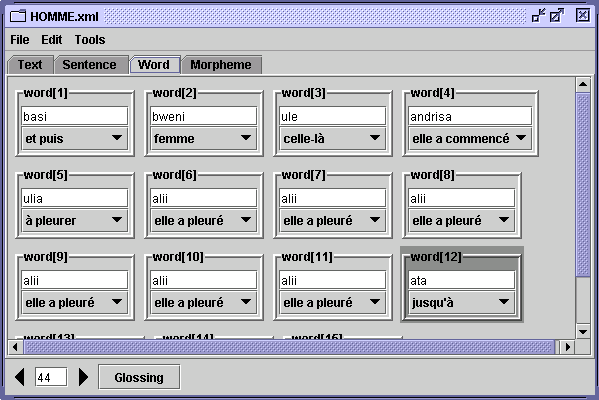
The editing window
The Text editor
The Text editor displays two fields, the upper one for transcription of a whole text and the lower for its translation. The content of these fields can extend over many lines.
The Sentence editor
The Sentence editor displays two fields, the upper one for transcription of a sentence and the lower for its translation. These fields are each limited to a single line, which may be long.
The Word editor
L'onglet Word editor displays a sentence, with each word in a separate frame. Each frame contains a field for entering the transcription in the upper half, and a menu showing the gloss in the lower half. To enter or change the gloss, open this menu and choose the option Other gloss.... You can then either choose from the list of all existing glosses, or enter a new gloss.
The Morpheme editor
The Morpheme editor displays a separate frame for each word, but here each frame is composed of as many sub-frames as there are morphemes in the word. Individual morphemes and their glosses are displayed and edited exactly as described above for words in the word editor.
Contextual menus
The windows corresponding to the various levels of annotation contain fields in which the annotation can be modified. Associated with each field is a contextual menu which is accessed by clicking on the right-hand mouse button when the cursor is in the appropriate field. This menu usually offers at least the three following possibilities for the element (text, sentence, word, or morpheme) corresponding to the field:
show attributes: show and edit the XML attributes of the element.show source: show and edit the XML source code corresponding to the element.transform...: apply an XSLT transformation defined in a file XSL-T to the element.
These options are mainly for advanced users. They are represented by the abbreviation "AST" (attributes-source-transform) in the table below. In addition to these, some of the contextual menus give access to important functions which do not require knowledge of XML. These are summarized in the table below.
Note that when transcription on a new level is produced by splitting or composing units of an existing transcription (1) the source transcription at the original level remains unchanged and (2) the newly created transcription becomes a separate entity, independent of the source transcription. Subsequent modification of one of them will have no effect on the other. Thus, for example, a morpheme-level transcription can be created from a broad phonetic sentence transcription and then be hand-edited to make a morphophonemic transcription.
| level | cursor position | right-click contextual menu options |
|---|---|---|
| Text | in the window; not in a field | AST: text |
| Text | upper (transcription) field | AST: text transcription
text > sentences : analyse the text into sentences sentences > text : compose a text transcription from sentences |
| Text | lower (translation/gloss) field | AST: text translation
sentences > text : compose a text translation from sentences translations |
| Sentence | in the window; not in a field | AST: sentence
insert sentence, duplicate sentence, delete sentence |
| Sentence | upper (transcription) field | AST: sentence transcription
sentence > words: analyse the sentence into words sentence > morphemes : analyse the sentence into morphemes sentence < words: compose a sentence transcription from words sentence < morphemes : compose a sentence transcription from morphemes |
| Sentence | lower (translation/gloss) field | AST : sentence translation |
| Word | in the window; not in a field | AST: sentence
insert, duplicate, delete sentence append word |
| Word | in word frame, not in a field | AST: word |
| Word | upper (transcription) field | AST: word transcription
sentence > morphemes : analyse the sentence transcription into morphemes split the word into two words split the word into two words |
| Word | lower (translation/gloss) field | AST: word gloss |
| Morpheme | in the window; not in a field | AST: sentence
insert, duplicate, delete sentence append word |
| Morpheme | in word frame, not morpheme sub-frame | AST: word
append morpheme |
| Morpheme | in morpheme frame, not in a field | AST: morpheme |
| Morpheme | upper (transcription) field | AST: morpheme transcription
split the morpheme in two mrophemes |
| Morpheme | lower (translation/gloss) field | AST: morpheme gloss |
The File menu
The File menu has 4 options: Load media file..., Save, Save as... and Close. The last 3 behave in the usual way. The first option, Load media file..., allows the user to open a video or audio file corresponding to his annotation. In the opening dialog, choose the tool which will be used to open the file, either Java Media Framework (JMF) or QuickTime for Java (QT4J). Once this choice has been validated, a slider appears at the bottom of the window, with a space for the video display if appropriate. In the editing window, the option play... ... will appear in the contextual menu of any object whose XML coding includes starting and ending timecodes. In the sentence view, a loudspeaker icon is displayed in the window.
The Edit menu
Undo... undoes the last change you made in the window. A second Undo... undoes what you did before that...
Redo... redoes the last modification that you undid. Another Redo... redoes what you undid before that...
Find... opens a dialog window in which a search of the annotation can be defined.

The search window
- The search can be limited to transcriptions or translations, of words or of morphemes.
- The search string can be defined as a literal string or as a regular expression.
- Literal string matching can be parametrized to include cases where the target string contains the search string or to require that the target string be identical with the search string.
- The search can begin with the active sentence or with the first sentence of the active file.
- The search can be constrained by further structural condiditons defined by XPath predicates (advanced users).
You need to understand the XML structure of your document and keep in mind that the current node is the word (find in
word transcriptionorword gloss) or the morpheme (find inmorpheme transcriptionormorpheme gloss). For example, in the Lacito DTD, the predicatancestor::S/@who='loc1'will restrict the find to sthe sentences from theloc1speaker.
Replace... provides for specifying a replacement string for strings matched in a search. Replacements can be effected one at a time (button Replace) or globally in the active file (button Replace all).
The Tools menu
The Tools menu menu has a single option: Apply stylesheet....
Apply stylesheet... allows the user to specify a file containing an XSLT transformation to be applied to the active file. You can either show the result or replace the data. You can show the source code of the result. In case of the result of the trasnformation is an HTML document (version 3.2), you can show it in an HTML browser.
III. References
Standards
- Tim Bray, Jean Paoli, C. M. Sperberg-McQueen, Eve Maler and François Yergeau (Eds). Extensible Markup Language (XML) 1.0 (Third Edition). W3C Recommendation, 04 February 2004.
- James Clark and Steve DeRose (Eds). XML Path Language (XPath) Version 1.0. W3C Recommendation, 16 November 1999.
- James Clark (Ed). XSL Transformations (XSLT) Version 1.0. W3C Recommendation, 16 November 1999.
- Unicode consortium web page http://www.unicode.org/
Links
- Short introduction to regular expressions (expressions régulières).
You'll find much more information whith a request"regular expressions"orRegexin your favorite web search engine. - LACITO "Archivage" program website (http://lacito.vjf.cnrs.fr/archivage/).
